
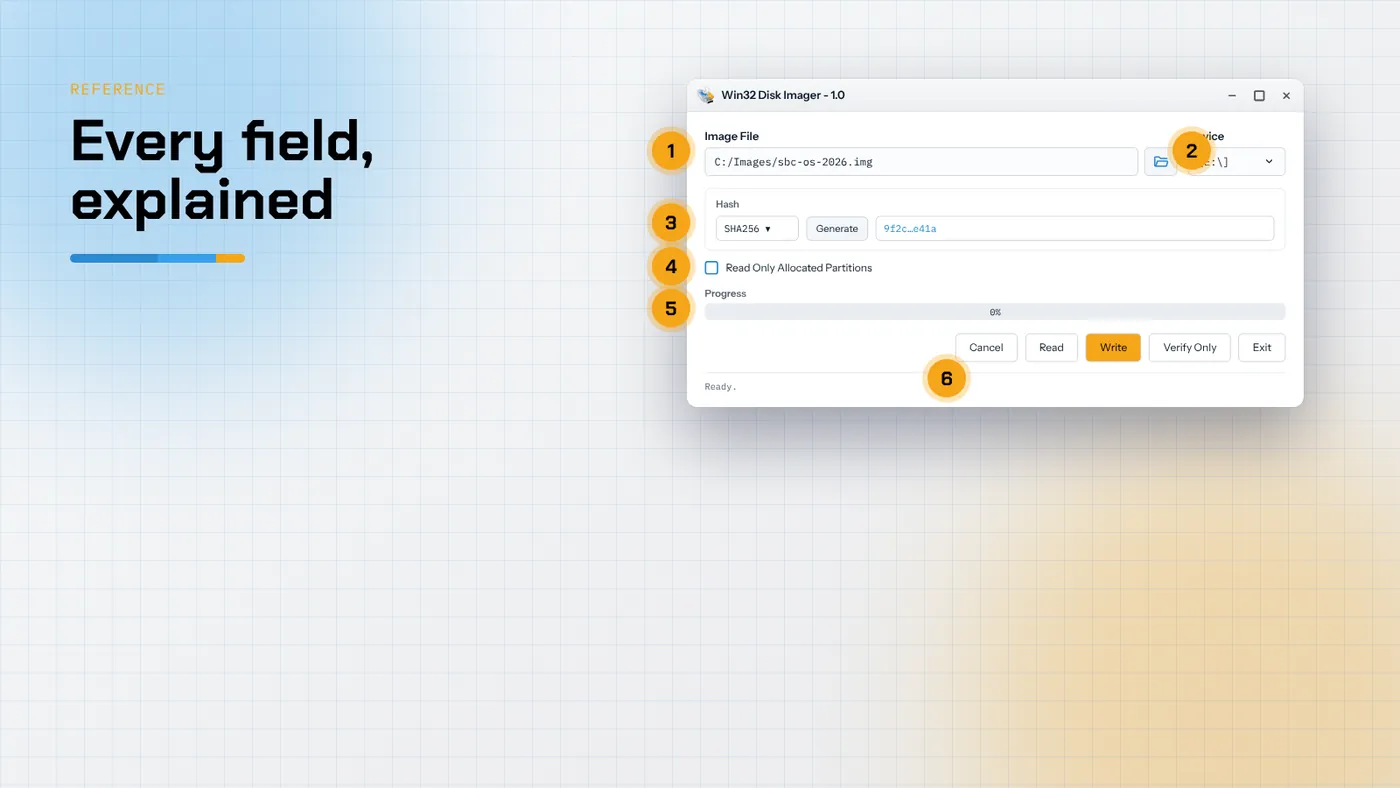
- The window has six areas: Image File, Device, Hash, the allocated-partitions option, Progress and the five action buttons.
- Typing a new file name in Image File and pressing Read creates an image; picking an existing one and pressing Write overwrites the device.
- Verify Only compares the image with the device and reads only as many bytes as the image holds.
- Every write replaces the device's entire layout, partition table included.
About this reference
This page works as a wiki for Win32 Disk Imager: one place that explains every control, every option and the messages you're likely to meet. The descriptions apply to the 1.0 release from SourceForge and to the native Win32 rewrite, which keeps the same interface. Where the native edition differs, it's noted.
The numbers match the callouts in the image above.
1. Image File
The text box at the top holds the path of the image file the program will read from or write to. Next to it is a folder button that opens a file dialog.
- For Write and Verify, the file must already exist.
- For Read, type the path of a file that doesn't exist yet. The program creates it. If you choose an existing file, it asks before overwriting.
- The file dialog's default filter shows
*.imgand*.IMG. To pick other raw formats, such as.bin,.rawor a hybrid.iso, switch the filter to all files. - The program remembers the last folder you used (stored per user since 1.0) and opens the dialog there next time.
One of the 1.0 fixes was checking that the box contains a real file name, not just a folder. If you see a complaint about an invalid file name, make sure the path ends in a file.
2. Device
A drop-down listing removable devices by drive letter, for example [E:\].
- Only removable media with a drive letter appear. That protects your system disk, but it also means cards with no recognised partition, and USB drives that report themselves as fixed disks, won't be listed.
- The list is built when the program starts and refreshed when devices change. If a card doesn't appear, reopen the list or restart the program after inserting it.
- Native edition: it can show the whole USB device as well as individual partitions on it, and displays the size of each. That makes it possible to target one partition without touching others, and the sizes make it easier to spot the right device.
Although you select a drive letter, Write and Read work on the whole physical device behind that letter in the 1.0 release. Selecting E: on a card with three partitions writes over all three.
3. Hash
A group containing a type selector, a Generate button and a read-only text field.
- Types: None, MD5, SHA1 and SHA256. SHA1 and SHA256 were added in 1.0.
- Generate calculates the hash of the file in Image File, not the device.
- The result appears in the text field, ready to select and copy.
- Use it to compare with the checksum the image's publisher lists, or to record a value for your own backups.
SHA-256 is the best choice when the publisher offers it. MD5 and SHA-1 are fine for catching accidental corruption but aren't considered secure against deliberate tampering.
Generating a hash reads the whole file, so on a large image it takes about as long as copying it.
4. Read Only Allocated Partitions
A check box that changes how Read behaves.
- Unticked: Read copies every sector of the device. A 32 GB card produces a 32 GB image, even if 28 GB of it is empty.
- Ticked: Read stops at the end of the last partition defined in the partition table. If you wrote a 2 GB image to a 32 GB card and never expanded it, you get a 2 GB image back.
It has no effect on Write or Verify. Bear in mind that many single-board operating systems expand their root partition to fill the card on first boot. After that, the "allocated" area is the whole card, and the option won't save any space. To shrink such a backup, shrink the last partition with a partitioning tool first, then read with the option ticked.
5. Progress
A progress bar showing how much of the current operation is done. The status bar below it shows the transfer rate and, during long operations, the estimated time remaining. On completion it reads Done, Write Successful, Read Successful or Verify Successful.
6. The action buttons
Cancel
Stops the current operation. Cancelling a Write leaves the device partly written and almost certainly unbootable. That's fine if you're about to write again, but don't put the card back in a device and expect it to work. Cancelling a Read leaves an incomplete image file; delete it.
Read
Copies from the device to the file in Image File. The device isn't changed.
Write
Copies from the image file to the device, starting at sector 0. Everything on the device is replaced, including its partition table and any partitions beyond the end of the image. The program asks for confirmation first and names the target device. Read that message.
If the image is larger than the device, the program warns that there isn't enough space. It won't truncate the image for you.
Verify Only
Reads the device and compares it with the image file, byte by byte. As the 1.0 notes explain, it compares the image to the device, not the device to the image. If you write a 2 GB image to an 8 GB card, Verify reads only the first 2 GB of the card. It doesn't change anything and can be repeated as often as you like.
Exit
Closes the program. If an operation is still running, cancel it and let the program finish cleaning up before you exit.
Supported media and file types
| Item | Supported | Notes |
|---|---|---|
| SD, SDHC, SDXC, microSD | Yes | Through any reader Windows sees as removable |
| USB flash drives | Yes | Some report as fixed disks and won't be listed |
| USB hard drives / SSDs | Usually not listed | Treated as fixed disks by Windows |
| CD/DVD | No | Stated in the release notes |
| USB floppy | No | Not supported |
.img, .bin, .raw |
Yes | Raw sector images |
Hybrid .iso |
Yes | Select with the all-files filter |
.zip, .gz, .xz, .7z |
No | Extract first |
.vhd, .vmdk |
No | Convert to raw first |
Messages you may see
| Message | Meaning |
|---|---|
| Write Successful. | All bytes were written without an error from Windows |
| Verify Successful. | The device contents match the image |
| Verify Failed. | At least one block differs; the card or reader is suspect |
| Not enough space on disk | The image is larger than the device |
| Error 5: Access is denied | Windows wouldn't grant exclusive access to the volume |
| Error 21: The device is not ready | The card was removed, or the reader isn't responding |
| Error 1: Incorrect function | Commonly from unusual readers or virtual drives; fixed in some cases in 1.0 |
| An error occurred when attempting to get a handle on the device | Another program has the device open, or rights are missing |
Keyboard and workflow tips
- Tab moves between Image File, the folder button, Device, the hash controls and the buttons.
- You can paste a path straight into Image File, which is faster than browsing for deep folders.
- Write, then Verify Only, without touching any field in between. Changing the device between the two is the most common way people verify the wrong card.
History in brief
- Early versions were written by Justin Davis to put Ubuntu images on USB sticks from Windows.
- 0.9.x moved to Qt and to the SourceForge project, and became popular with single-board computer users.
- 1.0.0 added Verify Image, SHA-1 and SHA-256, Read Only Allocated Partitions, the remembered folder and more translations, and fixed a long list of bugs, including multi-partition SD cards being only partly copied.
- Native Win32 rewrite (GitHub): the same interface without Qt, a much smaller binary, XP support, and partition-level device selection.
Licence
GNU General Public License v2. The Qt build ships Qt and MinGW runtime libraries under their own licences.
Glossary
Raw image – a file holding a byte-for-byte copy of a storage device, starting at sector 0. It contains the partition table and every partition, whatever their file systems.
Sector – the smallest addressable unit on the device, normally 512 bytes on SD cards and USB drives.
Partition table – the map at the start of the disk (MBR or GPT) that says where each partition begins and ends. Write replaces it; Read copies it.
Hybrid ISO – an ISO 9660 image that also contains a partition table, so it can be written raw to a USB drive and booted. Most Linux distribution ISOs are hybrids.
Volume lock – the exclusive access the program asks Windows for before reading or writing. If something else holds the volume open, the lock fails with an access error.
Allocated partitions – the area from sector 0 to the end of the last partition defined in the table, as used by the Read Only Allocated Partitions option.
Checksum / hash – a short value calculated from a file's contents. If two files have the same SHA-256, they are, for practical purposes, identical.
Summary
Win32 Disk Imager has few controls, and each does exactly one thing. Image File and Device choose the two ends of the copy. Hash checks the file. The allocated-partitions option trims backups. Read, Write and Verify Only move or compare the data. Treat Write as irreversible, verify every write that matters, and keep this page handy when a message doesn't make sense.